HTAN is one of the leading manufacturers of industrial hinges, handles and latches in China.


Industrial door hinge binding occurs when the installed motion path develops unwanted friction, interference, or elastic preload. The hinge pin may be the tight interface, but the same symptom can come from non-coaxial hinge axes, a leaf pulled against an uneven panel, a deflecting door or frame, gasket and latch side load, or contact at the door edge.
The most useful clue is not simply how hard the door feels to move. Record the assembly state and the angle at which resistance first appears. A hinge that is stiff before installation belongs to a different diagnostic branch from a free hinge pair that binds only after final tightening or after the door support is removed.
Diagnostic rule: preserve the as-found condition, support the door independently, and identify the first interface that changes when resistance begins. Do not start with lubricant, a longer wrench, or a replacement pin.
Isolate stored energy and follow the equipment service procedure before disconnecting a closer, gas spring, interlock, latch, or hinge. A large industrial door can move unexpectedly when one component is released. Never use the remaining hinges as temporary support while removing a loaded pin.
Binding Is a Symptom, Not a Root Cause
A binding door does not rotate with the expected smooth, repeatable effort through its intended travel. The resistance may be constant, rise at one angle, appear only near closed, or begin only when the door carries its full weight. Each pattern points to a different group of interfaces.
First confirm that the resistance is abnormal for the installed mechanism. A torque hinge, detent, cam-rise mechanism, door closer, compressed gasket, or powered interlock may intentionally add force over part of the motion. Compare the complaint with the released door function and the earlier baseline, not with a loose commodity hinge on a bench.
Binding is also different from excessive play. A worn joint may be loose at rest yet bind under load because the pin or bushing contacts only at one edge. Conversely, a close-running joint can feel stiff without visible looseness. Door-edge motion, sound, or appearance alone cannot identify the responsible component.
The Fastest Clue Is When Resistance Begins
Build a short resistance-onset map before changing the assembly. Use the same handle point, direction, speed, and door condition each time. An instrumented pull measurement is useful when the method is repeatable, but a number without the angle and assembly state has little diagnostic value.
| When resistance first appears | Interfaces to inspect first | Evidence to preserve | What it does not prove |
|---|---|---|---|
| Hinge is stiff while loose and unloaded | Pin, knuckle bore, bushing, thrust washer, retainer, finish, debris | Exact angular location, scrape pattern, temperature, contamination, axial and radial free movement | The door or frame is not yet implicated |
| Individual hinges move freely, but the installed set binds | Common hinge axis, leaf seating, bracket position, frame and door straightness | Axis datums, gaps under leaves, witness marks, change between supported and unsupported states | A free bench test does not clear the installed geometry |
| Binding begins during final fastener tightening | Mounting surface flatness, coating under the leaf, hole fit, shim stack, tightening sequence | Which fastener changes motion, leaf-to-panel gap, bracket shift, bolt seating | Higher fastener torque is not automatically the correction |
| Door is free while supported but binds under its own weight | Door sag, frame deflection, hinge load sharing, pin edge loading | Door-edge displacement, axis movement, upper-to-lower hinge response, contact marks | The hinge capacity cannot be judged from feel alone |
| Resistance occurs only near the closed position | Gasket, latch, stop, interlock, door edge, threshold, enclosure opening | Perimeter gap, transfer marks, first contact point, latch state | The hinge is not proven faulty because force is felt at the handle |
| Resistance grows after cycles or at a process condition | Lubricant condition, contamination, corrosion, local heating, thermal movement, polymer bushing behavior | Cycle state, actual component condition, debris, temperature near the joint, recovery after cooling or cleaning | Adding lubricant does not establish the original cause |
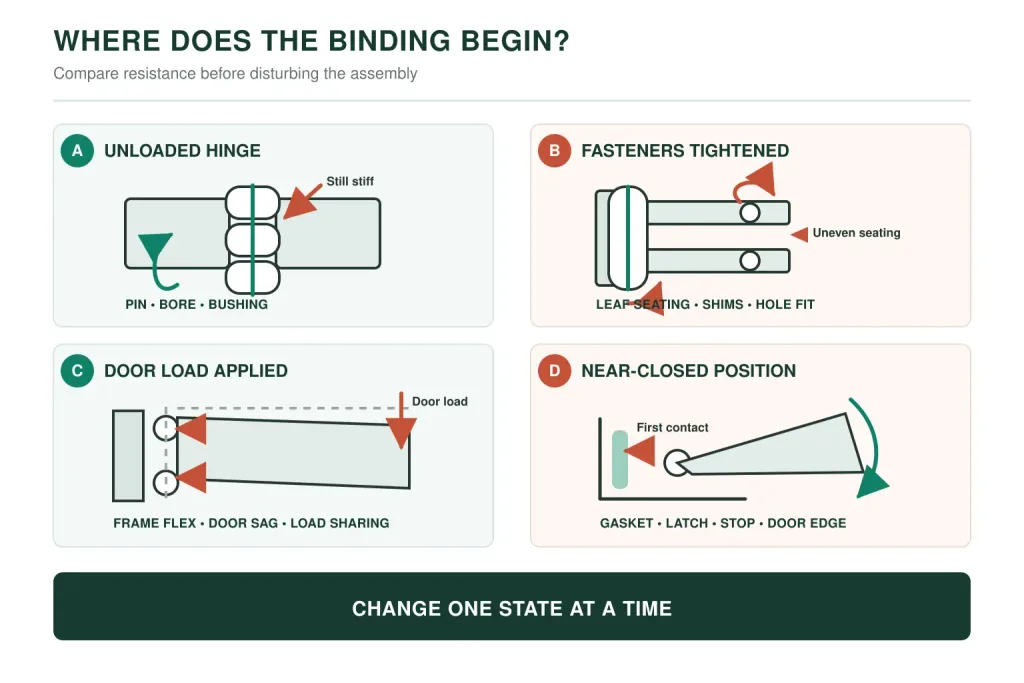
This sequence converts one vague complaint into several testable branches. It also prevents an installation-induced constraint from being misclassified as a defective hinge.
Read the Shape of the Resistance
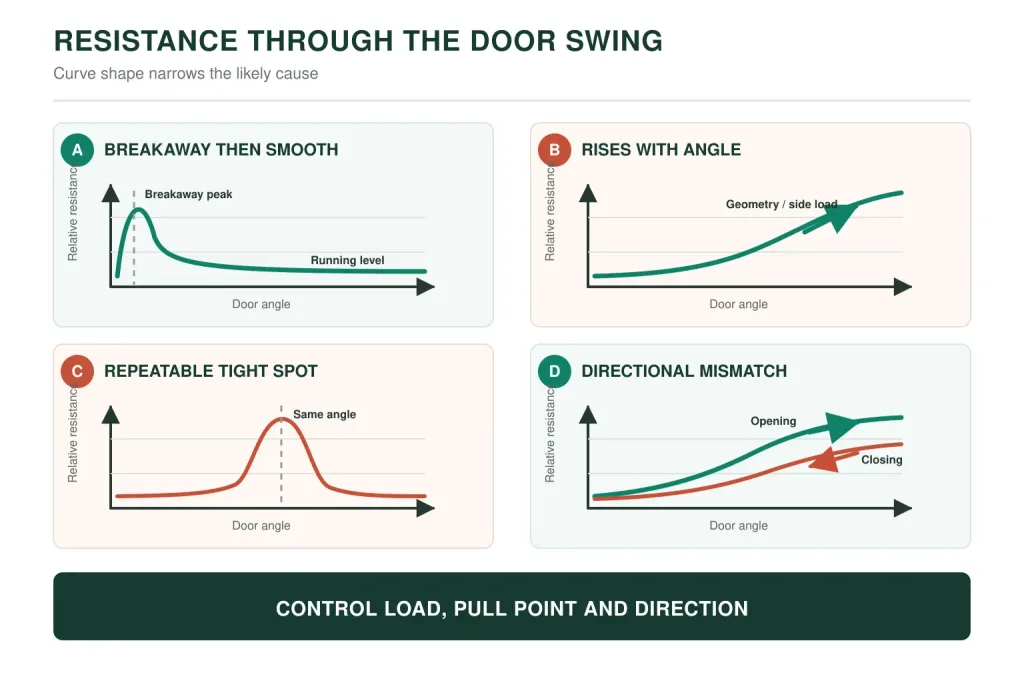
For industrial door hinge binding, the way resistance changes through the swing is as useful as the point where it begins. Compare breakaway effort with running effort, then repeat the same angle in both opening and closing directions.
- High breakaway effort followed by smoother travel points toward static friction, dried residue, lubricant condition, seal release, or a bearing surface that sticks after resting.
- Resistance that rises progressively with opening angle is more consistent with increasing side load, incompatible hinge paths, a closer or support device, cable pull, or structural deflection.
- A tight spot that repeats at the same angle in both directions suggests local interference, a bent pin, a damaged bore, a displaced bushing, or a rotating part contacting one fixed feature.
- Different effort at the same angle during opening and closing points toward directional contact, gasket or latch hysteresis, a closer, or a joint that shifts from one loaded edge to the other.
- Stick-slip or several small force peaks calls for inspection of transferred material, contamination, rough bearing surfaces, and intermittent contact along the door perimeter.
A pull-force reading is comparable only when the handle point, pull direction, distance from the hinge axis, door load, and opening angle remain the same. Use it to compare assembly states or a before-and-after repair condition. It is not a hinge load rating.
Separate the Hinge From the Rest of the Door System
The handle transmits the combined resistance of every component connected to the door. A latch cam, gasket, edge seal, cable carrier, gas spring, closer, rotary switch, door stop, or warped opening can make the operator feel hinge binding even when the pin rotates freely.
- Mark the complaint state. Note the door load, installed accessories, latch and seal condition, temperature state, opening direction, and the angle where the force changes.
- Support the door without lifting it out of position. A support that raises the free edge changes hinge loading and can hide the fault. Establish the as-found datum before altering the load.
- Observe the complete perimeter. Use transfer medium, removable witness tape, or a suitable gap check to find the first rub point. Avoid creating permanent marks on sealing or hygienic surfaces.
- Relax one influence at a time when the service procedure allows it. Separate latch, closer, seal, cable, or accessory forces without allowing uncontrolled door movement.
- Repeat the same motion. A large change after one influence is removed identifies a branch; it does not yet prove whether that component is misadjusted or merely reacting to a distorted door.
Near-closed resistance deserves special care. The hinge may be carrying a side load because the latch pulls a displaced door toward the frame. Lubricating the pin can lower the handle force slightly while the latch continues to force the assembly across its natural path.
If the Loose Hinge Is Already Stiff
When a safely unloaded hinge remains stiff after it is separated from the door system, the investigation moves inward. Do not drive the pin out immediately. Rotation marks, axial position, debris location, and the angle of the tight spot may reveal whether the problem is local damage, contamination, or an incorrect stack.
Pin-to-Bore or Pin-to-Bushing Friction
A bent pin, burred knuckle, distorted bore, displaced bushing, corrosion product, hardened residue, or embedded particle can reduce running clearance. A tight spot that repeats at the same hinge angle suggests localized geometry or surface damage. Resistance that changes after force reversal can indicate the pin is shifting between loaded regions rather than rotating concentrically.
Inspect the pin and bearing surface as a pair. A new pin installed into an oval, bell-mouthed, scored, or misaligned bore may bind immediately or soon reproduce the same wear pattern. Diameter alone does not establish a serviceable fit.
Axial Contact in the Knuckle Stack
Not all hinge friction is radial. A pin head, shoulder, washer, retainer, knuckle end, or thrust face can be clamped or side-loaded. Look for bright end-face rings, displaced washers, a retainer touching a rotating member, or a stack that becomes tight after the pin is fully seated.
Restoring free rotation by omitting a washer or leaving a retainer partly engaged is not a valid repair. The thrust path and pin retention still have to match the released assembly.
Free Hinges Can Bind as an Installed Pair
Two or more conventional hinges on one rigid door must rotate around one effective axis. Each hinge can pass a loose-piece check and still become constrained when its leaves are fixed to mounting points that do not share that axis.
The pin and bore have limited ability to accommodate angular error. When one hinge axis is offset or tilted relative to another, the door tries to follow incompatible circular paths. Clearance may absorb part of the error at one position, then disappear as the door rotates. The resulting edge contact raises friction and can produce a tight zone rather than constant drag.
This is a contact-distribution problem, not just an axis-line drawing problem. GGB’s plain-bearing engineering handbook shows the general mechanism: misalignment reduces the contact area and concentrates pressure toward a bearing edge. A hinge uses different components and acceptance limits, but the same edge-loading principle explains why a joint can feel free unloaded and tight under an installed side load.
Check the upper and lower hinges during the same slow movement. If one leaf rocks, one pin shifts sideways, or the gap between a leaf and mounting datum changes before the other hinge responds, the pair is not sharing motion normally. The full datum, spacing, reinforcement, and mounting design belong in the industrial cabinet door hinge mounting guide; this diagnosis only establishes whether installed axis error is present.
Why Final Tightening Can Create Binding
A bolt does more than hold a hinge leaf in place. As clamp load rises, the leaf is pulled toward the local mounting surface. If that surface is uneven, coated irregularly, distorted, unsupported, or offset from the intended datum, tightening can bend the leaf or rotate the hinge barrel.
Clearance in oversized or slotted holes adds another path. The assembly may swing freely while fasteners are snug, then move sideways as one fastener seats. A washer bridging a radius, paint ridge, weld spatter, burr, embedded debris, or mismatched shim can produce a similar change. The fastener that makes the door stiff is evidence about the joint beneath it; it is not necessarily a defective fastener.
Mark leaf position relative to the panel and record the tightening stage at which resistance changes. Where rework is authorized, release and restore the joint in a controlled sequence while the door is supported. The bolt-on machine-frame hinge guide covers joint architecture, adjustment features, and tightening control; the purpose here is only to prove that mounting preload is creating the bind.
Door Weight and Frame Flex Can Move the Axis
A support can make a problem disappear for two different reasons. It may remove radial load from a damaged pin or bushing, or it may return a sagging door and flexible frame to a more coaxial position. Those are not the same repair.
Compare several datums rather than watching only the door edge:
- pin relative to the knuckle or bushing;
- hinge leaf relative to its mounting panel;
- mounting panel relative to a stiff frame feature;
- upper hinge axis relative to the lower hinge axis;
- door edge relative to the enclosure opening.
If the pin stays centered while the leaf and panel move together, the structure is changing the hinge position. If the panel remains stable but the pin shifts to one edge of the bore, the joint is carrying a side load. If the entire axis remains stable and the door edge rubs only near one corner, investigate door shape and frame interference.
Do not use the latch to pull a sagging door into place. That transfers the alignment error into gasket compression, latch load, and hinge side load, often making a near-closed bind appear to be an internal hinge problem.
When Binding Begins After Finishing, Service, or Temperature Change
The time at which the symptom first appears helps separate surface buildup from progressive damage and condition-dependent movement. Treat the event history as evidence instead of grouping every discolored or dirty joint under corrosion.
- Binding immediately after coating or reassembly: inspect for finish inside the active bore, a paint ridge beneath the leaf, coated locating faces, trapped debris, an incorrect washer stack, or a retainer that now clamps the knuckles. The important comparison is the finished assembly against the previously free condition.
- Binding that worsens during service: map corrosion product, migrated lubricant, embedded particles, scoring, transferred metal, and bushing displacement before cleaning. The debris location and rub direction can show where load is concentrated.
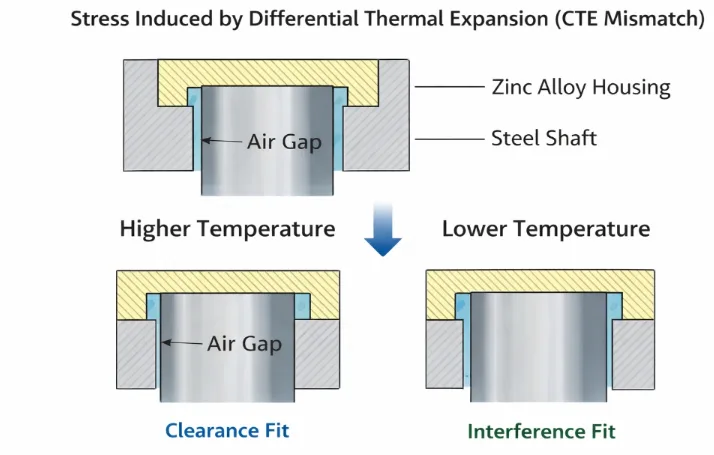
- Binding that appears only hot, cold, or after washdown: note the actual hinge-area condition, door load, first tight angle, moisture or residue, and whether free motion returns after recovery. Differential expansion, lubricant behavior, and some polymer bearing materials can change the interface without every component following the equipment setpoint.
A polished or damaged region shows where contact occurred, not necessarily why it occurred. Preserve its location and direction before cleaning. A remote axis error, side load, or moving frame can force an otherwise suitable surface into abnormal contact.
Lubrication and Retightening Can Hide the Evidence
Lubricant can reduce sliding friction, soften stick-slip, or carry contamination away from one contact. It cannot make separated hinge axes coaxial, straighten a bent pin, remove door-edge interference, or restore a moving reinforcement. If the force drops after approved lubrication, capture that change as evidence that friction contributes to the symptom. A quieter or lighter joint still does not prove that lubrication was the only cause.
Retightening has the same ambiguity. It may restore clamp at a slipping leaf, or it may pull the leaf harder against a distorted surface and increase binding. Mark the joint and observe the motion before changing torque. Use only the specified fastener, locking method, lubricant condition, and tightening procedure for the assembly.
A forceful door cycle is not a diagnostic test. It can smear contact marks, brinell a soft bushing, score a pin, bend a leaf, or convert a reversible adjustment problem into permanent damage.
Capture Evidence Before Disassembly
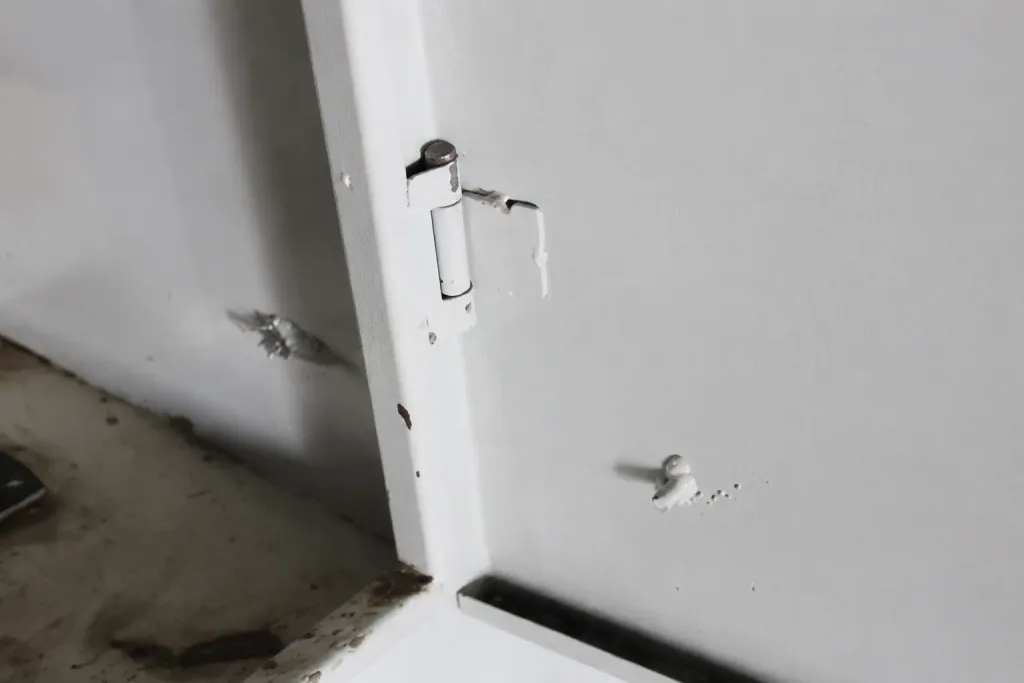
A useful inspection record lets another person reconstruct the mechanical state. Photograph the complete hinge set and the local interfaces before removing pins or cleaning surfaces.
| Observation | How to make it comparable | Question it answers |
|---|---|---|
| Resistance onset and shape | Same handle point, pull direction, speed, door load, opening angle reference, and motion direction | Is the fault constant, local to one angle, or linked to a changing geometry state? |
| Supported versus unsupported behavior | Bring the support into contact without raising or twisting the door; note the door-edge datum | Does load change internal contact or assembly alignment? |
| Leaf and bracket witness marks | Mark fastener-to-leaf, leaf-to-panel, and panel-to-frame separately | Which clamped or structural interface moves first? |
| Pin and knuckle condition | Capture orientation, axial position, tight angle, debris, rub direction, and wear location | Is friction internal, axial, radial, or imposed by side load? |
| Perimeter contact | Map the first door-edge, seal, latch, stop, or threshold contact | Is the hinge being blamed for resistance elsewhere? |
| Assembly history | Note when the symptom began relative to installation, coating, impact, adjustment, accessory changes, or service | Did the fault exist from assembly or develop in operation? |
Installation-origin binding usually appears at first assembly, after final tightening, after welding or coating, or when a specific bracket position is set. Service-origin binding is more likely to show a change from a known baseline together with debris, corrosion, loss of lubrication, deformation, impact evidence, progressive wear, or movement at a previously stable joint. The evidence can overlap, so timing narrows the branch but does not replace inspection.
Stop cycling the door and escalate the inspection if resistance rises suddenly, the door drops or changes position, a pin or retainer migrates, a leaf, knuckle, fastener joint, or weld cracks, or fresh metal transfer and local heating develop. Continuing to force the motion can destroy the evidence and enlarge the damage.
Repair the Interface That Was Proven
The correction should remove the cause without shifting the constraint somewhere else.
- Internal pin, bore, or bushing damage: inspect the complete wear pair, thrust faces, and retainer. Replace only the parts identified as serviceable by the released assembly.
- Non-coaxial hinge set: restore the controlled mounting datums and hinge axis. Do not use the pin, latch, or door weight as an alignment tool.
- Leaf distortion or mounting preload: correct the seating surface, shim condition, hole fit, reinforcement, and fastening method before judging the hinge.
- Door or frame deformation: repair the structural cause and re-establish the opening geometry. A stronger hinge on the same moving panel may increase local stress without correcting the path.
- Seal, latch, stop, or edge contact: restore the specified closed-door datum and perimeter contact without forcing the hinge pair sideways.
- Contamination or corrosion: clean and protect the joint using a process compatible with its materials and environment, then inspect for dimensional damage that cleaning cannot reverse.
A candidate replacement pin must match more than nominal diameter. Working length, straightness, material and hardness pairing, surface condition, head and tip geometry, thrust arrangement, retention coordinate, and fit with the actual bore all matter. Use the industrial hinge pin interchangeability check before substituting a pin.
Replace or escalate the complete hinge assembly when a captured joint cannot be inspected safely, knuckles or leaves are permanently deformed, cracks are present, the retention feature is damaged, the bearing seat cannot be restored, or the hinge is part of a qualified safety or containment function that does not permit component-level repair.
Prove Free Motion After Final Assembly
A repaired hinge that moves freely on the bench has not yet passed. Recheck after the leaves are fully fastened, temporary supports are removed, accessories are restored, and the latch and seal operate in their final condition.
- Check the complete permitted travel in the final fastening condition. Compare breakaway and running effort in both directions; note any scrape, repeatable tight angle, door twist, rebound, or renewed bracket movement.
- Remove temporary support and restore the production door load. Include approved door-mounted equipment and the normal orientation represented by the complaint, then confirm that the hinge pair and mounting structure remain stable.
- Restore the complete closed-door system. Verify latch engagement, gasket or seal contact, stops, interlocks, clearances, and door-edge position without using those components to pull the door across an incorrect path.
- Repeat the original fault condition and save the new baseline. Recreate the relevant temperature, contamination, or operating state within the equipment service limits, then capture the final configuration and measurement method for later comparison.
There is no universal acceptable opening force, pin clearance, or alignment tolerance for every industrial door. Acceptance must come from the door function, hinge construction, released drawing, safety requirements, and application environment. Broader production-intent checks belong in the machine-door hinge assembly validation process.
Send the Binding State, Not Just the Hinge Size
For a hinge-focused review, provide the installed hinge part number, door dimensions and mass, hinge quantity and spacing, mounting sections, opening direction, photos of every hinge and door edge, the angle where resistance begins, supported and unsupported behavior, and any witness marks or damaged surfaces.
HTAN can compare that evidence with available industrial hinge configurations and drawing inputs. Door structure, latch and seal geometry, guarding, interlocks, and powered equipment still require review as part of the complete machine assembly.
Industrial Door Hinge Binding FAQ
Can lubrication fix an industrial door hinge that binds?
Lubrication can reduce friction when the approved lubricant is missing, degraded, or contaminated. It cannot correct non-coaxial hinge axes, a bent pin, distorted mounting surfaces, door-edge interference, or structural flex. Record the motion before and after lubrication instead of treating a quieter joint as proof of repair.
Why does a door hinge bind only after the bolts are tightened?
Final tightening may pull the hinge leaf against an uneven or coated mounting surface, shift a slotted joint, compress an incorrect shim stack, or rotate the hinge barrel. Record which fastener and tightening stage changes the motion, then inspect the seating surface and axis before applying more torque.
Why does the door move freely when supported but bind under its own weight?
Support can remove pin edge load or return a deflecting door and frame to a more coaxial position. Compare pin-to-bore movement, leaf and panel movement, upper-to-lower hinge alignment, and door-edge position before deciding whether the cause is internal wear or structural deflection.
Why does an industrial door bind only near the closed position?
Near-closed binding often comes from gasket compression, latch pull, a door stop, an interlock, a threshold, or door-edge contact. Map the first perimeter contact and repeat the movement with each influence safely isolated before blaming the hinge.
Can I drive or bend the hinge pin to align several hinges?
No. The pin should not be used to force incompatible hinge axes into line. Driving or bending it can damage bores, bushings, retention features, and leaves while hiding the mounting error. Support the door and restore the controlled hinge datums instead.
When should the complete industrial door hinge be replaced?
Replace or escalate the complete assembly when the hinge has cracks, permanently deformed knuckles or leaves, damaged pin retention, an unserviceable bearing seat, a captured joint that cannot be inspected safely, or a qualified safety function that does not permit component-level repair.