HTAN is one of the leading manufacturers of industrial hinges, handles and latches in China.


Choosing the right paddle latches for a sheet-metal door requires more than matching sizes—it depends on door structure, reinforcement, drilling accuracy, and compliance with safety standards. Understanding how the door is built and how different latch types interact with it is essential to achieving a secure, durable, and professional installation.
Understanding Sheet-Metal Door Structure and Paddle Latch Compatibility
Sheet-Metal Door Construction Basics
Most sheet-metal doors contain the following components:
- Steel skins (0.8–1.2 mm)
- Honeycomb, rock wool, or PU foam core
- Optional reinforced mounting plate (≈3 mm steel)
Many commercial steel doors follow:
- ANSI/SDI-100 (Steel Doors and Frames)
- ANSI/SDI-105 (Installation Practices)
When no internal reinforcement exists, installers must compensate using rivet-nuts, spacers, or backing plates to prevent metal deformation.
Key factors affecting Paddle Latch compatibility:
- Door thickness (40–50 mm typical)
- Core material rigidity
- Existing reinforcement
- Latch backset requirements
- Required drilling clearance
Types of Paddle Latches (Materials, Functions, Durability)
Plastic Paddle Latches
- Lightweight
- Suitable for cabinets
- Not recommended for heavy steel doors
Zinc/Aluminum Alloy Paddle Latches
- Good cost-performance balance
- Electroplated for corrosion resistance
Stainless Steel Paddle Latches (304/316)
- Industrial-grade
- Ideal for exterior or high-frequency usage
- Many models comply with ANSI/BHMA A156.2 Grade 1
Locking vs. Non-Locking Paddle Latches
- Locking Paddle Latch uses replaceable or integrated cylinders
- Meets EN 1303 (Europe) or ANSI/BHMA A156.5 (US)
- Non-Locking Paddle Latch works as a pull handle with a latching mechanism only
Door Handing (Left/Right)
Confirm latch handing before drilling—although many Paddle Latches are reversible.
Compatibility Checklist Before Installation
✔ Door Thickness
Most Paddle Latches fit 30–50 mm door thickness. Check:
- Cylinder projection
- Spindle length
- Bolt reach
✔ Hole Requirements
Paddle Latch templates specify:
- Backset: 40 mm / 60 mm
- Main bore diameter: Ø25 mm – Ø50 mm
- Through-bolt spacing: varies by brand
✔ Mounting Method
Best for metal doors:
Through-Bolt Fastening
- Two long bolts clamp both sides
- Delivers superior strength
- Prevents panel distortion
Not recommended for metal doors:
Spring-clip fastening
- Intended for thin cabinet panels
✔ Reinforcement Solutions
If the door lacks a built-in support plate:
- Rivet nuts
- Anti-vibration washers
- Steel backing plates
Tools and Materials for Installing a Paddle Latch
Essential Tools
- Phillips & flat screwdrivers
- Variable-speed drill/driver
- HSS or bi-metal hole saw (25–50 mm size)
- Impact drill for thick metal skins
Precision Measuring Tools
- Tape measure
- Spirit level / laser level
- Silver paint pen
- Center punch
Materials
- Zinc paint or rust-preventive spray
- Spacers or washers
- Rubber seal (outdoor installations)
Measurement and Positioning (Critical Accuracy Phase)
Standard Height for Paddle Latches
Per building codes:
- ICC/IBC: 34–48 in (864–1219 mm)
- ADA: ideal at 36–40 in
Typical installation: 1 meter (39–40 in) from finished floor.
Marking the Paddle Latch Location
Steps:
- Mark height on both sides of the door
- Extend horizontal level line
- Measure inward for backset
- Mark central bore hole
- Mark upper & lower through-bolt holes
- Center-punch every location
How to Avoid Measurement Errors
- Do not trust door frame alignment
- Drill a pilot hole first
- Transfer marks from outside → inside using pilot hole
- Double-check both sides before using a hole saw
Drilling Procedures for Paddle Latch Installation
Main Bore Hole Drilling
- Drill 3 mm pilot hole
- Mount hole saw and apply cutting oil
- Drill at low–medium speed
- Slow down before breakthrough to protect steel skin
Relevant safety standards:
Drilling Through-Bolt Holes
- Use appropriate drill bit for M4/M5 hardware
- Keep drill perfectly vertical
- Hole size = 85–90% of screw outer diameter
Deburring and Rust Protection
- File rough edges
- Vacuum all metal chips
- Apply zinc-rich primer or anti-rust spray
Installing the Paddle Latch Assembly
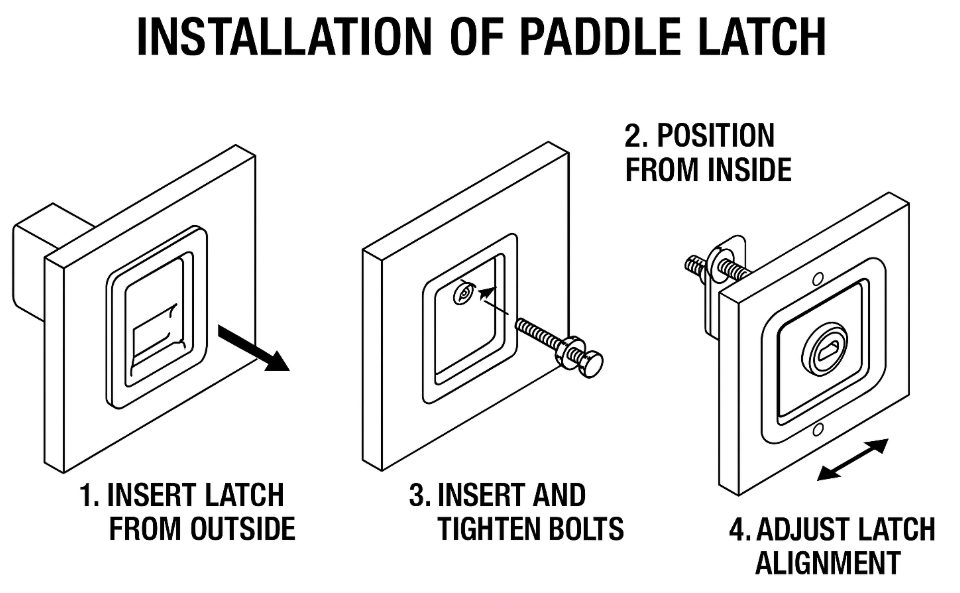
Insert Exterior Paddle Latch Assembly
- Insert paddle housing through main bore
- Check latch tongue alignment
- Confirm correct handing
Attach Interior Assembly & Tighten Through-Bolts
- Align spindle and cylinder tailpiece
- Insert the two long bolts
- Tighten in alternating pattern
- Use spacers if necessary to prevent bending
Adjust Latch Movement and Handle Spring
Verify:
- Smooth action
- Clean latch retraction
- Firm spring return
If not smooth:
- Re-center latch body
- Apply silicone or graphite lubrication
- Adjust tension screws (if applicable)
Functional Testing and Safety Validation
Operation Testing
Cycle door 20+ times:
- Paddle movement smooth
- Latch retracts fully
- Door closes snugly
If slamming is required → adjust strike plate.
Structural Tightness Check
Ensure:
- No wobbling
- No rattling
- No metal flexing
- No screw loosening
Solutions:
- Thread-locker
- Larger screws
- Rivet nuts
Safety & Fire-Door Considerations
For fire doors:
- Only use Paddle Latches certified for UL 10C or EN 1634-1
- Avoid damaging fire-resistant core
- Seal exposed cavities with fire-rated sealant
Test handle usability for:
- Elderly
- Children
- Low-force operation
Maintenance Guidelines for Paddle Latch Longevity
Regular Screw Tightening
Intervals:
- High-traffic doors: every 3 months
- Residential: every 6–12 months
Lubrication
Use:
- Silicone spray
- Graphite powder
Avoid:
- Engine oil
- Conventional grease
- WD-40 inside cylinders
Rust Prevention
For coastal/humid areas:
- Use 316 stainless steel Paddle Latches
- Select products meeting EN 1670 Grade 3+
- Apply zinc spray to drilled surfaces
Cold-weather maintenance:
- Anti-freeze lubricant
- Keep keyways dry
Troubleshooting: Paddle Latch FAQ
Why is the Paddle Latch handle loose?
Causes:
- Loose set screw
- Worn spindle
Fix:
- Retighten screw + apply thread-locker
- Replace spindle
Latch does not return properly
Causes:
- Spring deformation
- Latch misalignment
Fix:
- Re-center latch
- Lubricate
- Replace spring
Noise during opening/closing
Causes:
- Dry hinges
- Internal metal friction
Fix:
- Lubricate hinges
- Lubricate latch mechanism
- Tighten all screws
Conclusion
A properly installed Paddle Latch ensures durability, secure operation, and smooth user experience on any sheet-metal door. By following the technical procedures and standards referenced here—including ANSI/BHMA, ICC/IBC, ADA, UL, and EN—installers can achieve professional-grade results suitable for industrial, commercial, or residential applications.
Regular maintenance and correct installation are the keys to reliable long-term performance.

Anson Li
文章: 576RELATED POSTS
Application of Recessed Handles in Mechanical Equipment
Swivel Torque Hinges: The Key to a Stable and Flexible Display Screen
Laptop Torque Hinge Key Demands and Comprehensive Guide
Engineering Guide: Why 304 Stainless Steel is the Standard for Industrial Hinge Pins
Latching Door Handle A Comprehensive Guide