HTAN is one of the leading manufacturers of industrial hinges, handles and latches in China.


Black dust around industrial hinges is usually a deposit produced or collected near a moving joint. It may contain metal and oxide wear debris, particles from a bushing or surface finish, aged lubricant, or contamination carried in from the surrounding equipment. Its color alone does not identify the material or prove that the hinge pin has failed.
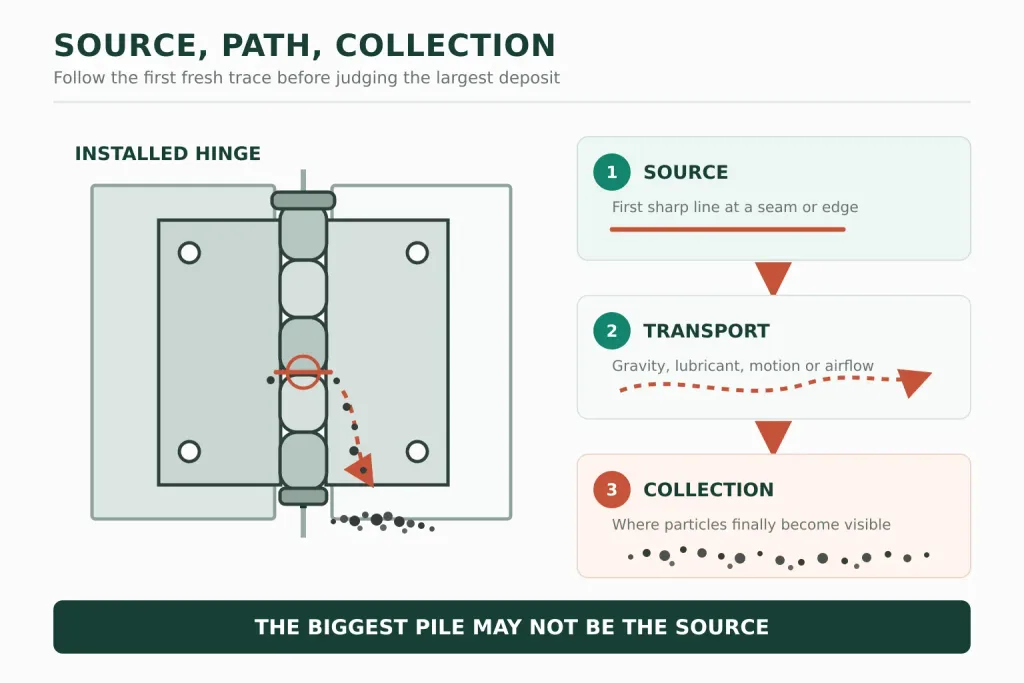
The useful question is not simply, “What is the black powder?” It is, “At which interface did fresh material first appear, and how did it travel to the visible deposit?” A dark streak below the lowest knuckle may have fallen from a pin-to-bore contact above it. Powder around a leaf edge may instead come from micro-slip between the leaf and mounting panel, where no rotary motion should occur.
Before touching the hinge: photograph and sample the as-found deposit before cleaning, lubricating, tightening fasteners, or removing the pin. Separate the source contact, the transport path, and the final collection area.
Support the door and follow the equipment service procedure before disturbing a load-carrying hinge. Do not blow unknown dust with compressed air or handle it outside the site’s contamination and PPE controls. Process dust, coating particles, lubricant residue, and metallic wear debris may require different handling.
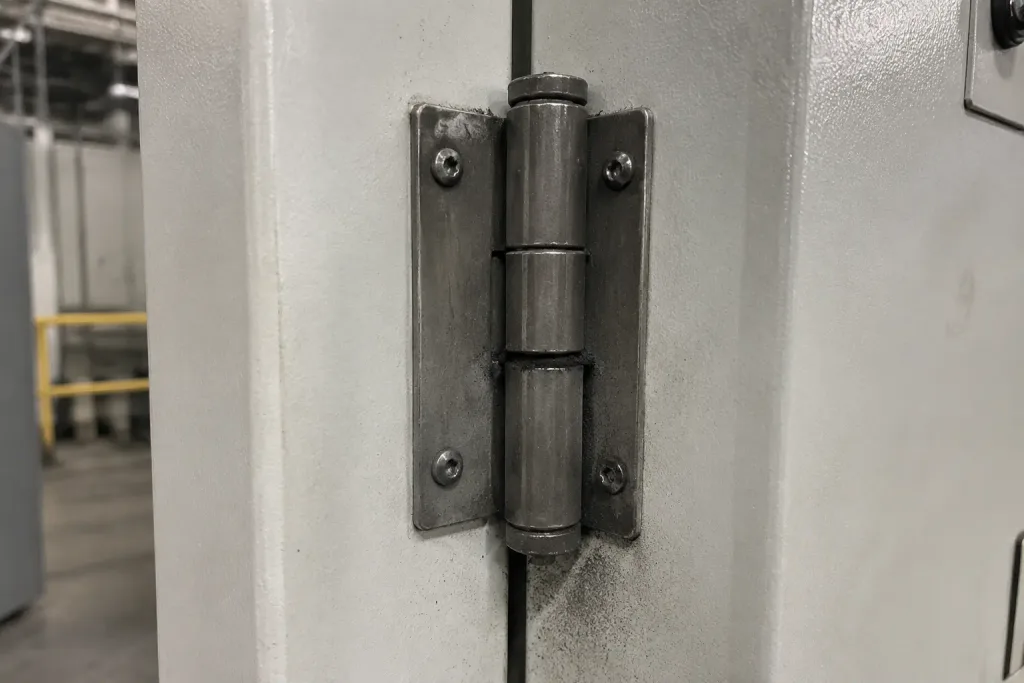
Black Dust Is Evidence, Not the Failed Part
A hinge creates particles when two surfaces slide, impact, or move microscopically under load. The particles may oxidize, mix with lubricant, collect external dirt, and become darker than either original component. A black paste therefore describes a transported mixture. It does not distinguish a worn steel pin from a polymer bushing, a coated thrust washer, or dirt held in grease.
The deposit becomes more significant when it is fresh and repeatable. Dust that reappears from the same seam after a controlled clean points to an active generation path. Rapid recurrence together with increasing play, a new tight spot, pin migration, local heating, metal transfer, cracked coating, or a changed door position deserves prompt inspection. An old film on several non-contact surfaces may instead be environmental contamination.
Do not wait for the powder to identify the complete failure mode. A worn joint can remain quiet, while a hinge that still feels smooth can produce debris at a mounting face. If the hinge also develops abnormal resistance, record the motion symptom as a separate fault state rather than using the powder alone to explain it.
Trace the Source, Transport Path, and Collection Area
The darkest or largest pile is not necessarily the source. Gravity carries dry particles downward. Grease can move them along a pin or thrust face. Door motion can push a paste through a knuckle seam. Airflow, washdown, wiping, and vibration can spread material across the panel.
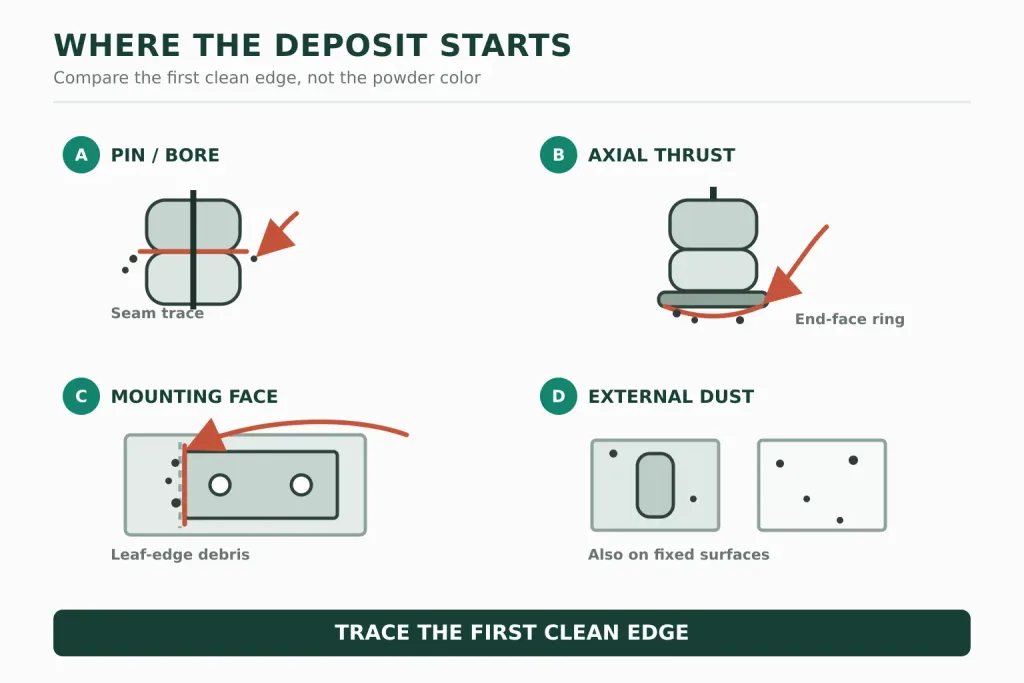
| First clean edge where deposit appears | Contact to observe | Pattern that adds useful evidence | What the location does not prove |
|---|---|---|---|
| One knuckle seam | Pin to bore or pin to bushing at that knuckle | Fresh line at the seam, matching rub direction, localized polished or scored zone | The pin alone is not proven worn; the bore, bushing, alignment, and side load remain part of the wear pair |
| Below the lowest barrel | All knuckle seams and the lower thrust contact | Vertical fall line, repeated accumulation after cleaning, particles emerging higher on the hinge | The lowest knuckle is not automatically the generating interface |
| At a pin head, washer, cap, or knuckle end | Axial thrust face and retention stack | Circular witness ring, displaced washer, end-face polish, dust concentrated on one side | Radial pin clearance is not established by an end-face deposit |
| Around a leaf edge or fastener washer | Leaf-to-panel or bracket-to-frame clamped joint | Broken witness line, finish loss under the edge, fine debris at one fastener, leaf rocking | The rotating pin interface may remain serviceable |
| At a bushing lip | Bushing edge, bore support, pin surface, and axial retention | Extruded lip, uneven wall exposure, fragments with the same appearance as the bushing | Color cannot identify the polymer or show whether the bushing moved because of load, fit, heat, or chemical exposure |
| Across the hinge, frame, and nearby equipment | External process and housekeeping path | Similar deposit on stationary non-contact surfaces, airflow direction, overspray, fibers, soot, or machining residue | Proximity to the hinge does not make the hinge the source |
Begin at the first sharp boundary of fresh deposit, then work outward. A diffuse stain tells less than a narrow emission line. When several hinges are installed vertically, inspect from the top down before assuming the bottom hinge generated everything collected beneath the stack.
Preserve the Pattern Before Cleaning
Cleaning too early removes the relationship between the particles and the contact that produced them. Lubricant can turn a dry trace into a paste and carry it to a different seam. Fastener tightening can close a slipping joint and erase a witness line. Pin removal can rotate or mix the wear surfaces.
- Photograph the complete door and every hinge. Record hinge orientation, upper and lower positions, gravity direction, door position, and nearby sources of dust or airflow.
- Move closer without wiping. Capture each knuckle seam, pin end, thrust surface, bushing lip, leaf edge, fastener group, and the panel below the hinge.
- Mark the deposit boundary. Note the first sharp line, the direction of any streak, and whether the material is dry, oily, flaky, fibrous, or embedded in a rubbed surface.
- Keep samples separate. If site procedure permits sampling, do not combine material from the pin seam, mounting face, floor, and surrounding machine. Label the location and operating state.
- Record the operating history. Note whether the deposit appeared after coating, installation, washdown, lubricant application, a door impact, temperature change, process change, or a period of vibration.
- Observe one controlled motion. Where safe, watch the source boundary during a slow opening and closing cycle. Stop if there is sudden resistance, door drop, retainer movement, cracking, or fresh metal transfer.
A white card or clean collection surface placed outside the motion and sealing path can make newly emitted particles easier to see after the original evidence has been recorded. It must not enter the joint, change clearance, contaminate the process, or become a loose object inside the equipment.
Match the Deposit to the Contact Interface
Pin-to-Bore Wear Leaves a Radial Path
In a plain pin joint, door load is carried through limited regions of the pin and bore or bushing. Misalignment, a bent pin, an enlarged bore, poor load sharing, or a displaced bushing can concentrate contact near one knuckle edge. Repeated rotation then releases particles from the loaded track.
Look for agreement between three pieces of evidence: the seam where dust first emerges, the loaded side of the pin or bearing surface, and the direction of scoring or polish. A new pin does not correct an oval bore or a bushing that has lost support. If replacement is being considered, the hinge pin interchangeability check covers the geometry and retention fields that diameter alone misses.
Axial Contact Produces a Different Trail
A pin head, washer, shoulder, retainer, or knuckle end can carry axial contact. Dust concentrated at an end face, especially with a circular rub mark, points toward the thrust stack rather than the radial bore. A vertical hinge may keep the same faces loaded by gravity; an inclined or horizontal pin changes that relationship.
Observe whether the pin or door moves along the hinge axis when the hand force reverses. Missing, displaced, clamped, or incompatible thrust parts can create wear even when radial motion appears acceptable. Do not remove a washer or leave a retainer loose simply because the joint turns more freely afterward.
Fretting at the Mounting Face Begins Outside the Barrel
A hinge leaf and mounting panel are intended to remain clamped together. Small repeated slip at that interface can damage the finish and generate fine debris without obvious gross movement. Vibration, surface settlement, an uneven mounting face, inadequate local support, damaged threads, or a bracket working on thin sheet can sustain the micro-motion.
General tribology guidance from SKF describes fretting corrosion as damage driven by micro-movements between loaded surfaces and notes that oxide can form as the contact deteriorates. A hinge mounting face is not a rolling bearing seat, but the diagnostic principle is transferable: a clamped joint can produce wear debris even though it is not the rotating joint. See SKF’s bearing damage and fretting overview.
Place witness marks across the fastener head and leaf, the leaf and panel, and the panel and stiff frame datum. These three marks separate fastener rotation, leaf slip, and panel flex. Tightening the fastener before marking the joint may stop the visible motion temporarily while destroying the evidence that located it.
Bushings and Coatings Can Resemble Metal Dust
A dark bushing can shed powder or small fragments at its lip. A black finish can flake from a thrust face, pin, or leaf edge. Grease can darken after holding fine particles. These deposits may look similar in a photograph but lead to different repairs.
Compare the particle form with the adjacent component rather than identifying it by color. Plate-like flakes may follow a coating layer. Soft curls or lip fragments may follow bushing deformation. A fine paste may be a mixture carried by lubricant. Microscopy can reveal particle shape, but appearance still does not establish chemical composition. Where contamination control, safety, or a warranty decision depends on material identity, retain a clean sample for suitable laboratory analysis.
Why Only One Hinge May Produce Dust
Several hinges on one door do not automatically carry equal radial, axial, and moment reactions. Door and frame stiffness, hinge spacing, coaxiality, local reinforcement, latch pull, and installation sequence can place one joint against a loaded edge while another moves with greater clearance.
The dusty hinge may therefore be the first visible wear location rather than the original source of the load error. Compare the dust boundary and contact track at every hinge. One-sided wear repeated at the same edge across the hinge set suggests a common directional load. Opposing wear directions or one hinge with mounting-face debris can point toward axis mismatch or local bracket movement.
This comparison does not establish a hinge load rating or justify adding another hinge. If the investigation reaches door mass, center of gravity, hinge spacing, structural deflection, or axis control, route that work to the industrial cabinet door hinge mounting guide.
Lubrication Can Erase the Best Evidence
Fresh lubricant can reduce noise and friction, flush particles from one seam, and spread them into another. That change may be useful after the original condition has been documented, but it does not prove that lubrication was the root cause. Misalignment, an oval bore, damaged thrust surfaces, a moving leaf, or an unsupported panel can continue generating debris under a new lubricant film.
Use only the lubricant and application point specified for the hinge construction and equipment environment. A nominally maintenance-free bushing, a dry-running polymer interface, a food-area assembly, and a greaseable metal joint do not share one service method. Excess lubricant can retain abrasive contamination, migrate onto seals or product areas, and make the next inspection harder to interpret.
Choose the Repair by the Proven Source
- External contamination only: remove it using the equipment’s approved cleaning method, then establish a clean reference area and watch for recurrence. Do not disturb a stable hinge merely because dust collected nearby.
- Pin, bore, or bushing wear: inspect the complete wear pair, its support, alignment, thrust contacts, and retention. Replacing the softest or easiest part without correcting edge load can reproduce the debris path.
- Axial thrust wear: restore the specified washer, shoulder, end-face, clearance, and retainer relationship. A pin that cannot escape may still move enough to wear an end surface.
- Leaf or bracket fretting: restore the clamped joint, mounting-face condition, hole fit, reinforcement, and specified fastening method. Lubricating the external leaf-to-panel interface is not a substitute for clamp and support.
- Coating or finish loss: identify why the active contact reaches the coating before selecting a repair. Recoating the same rubbing region can hide the witness mark without changing the interference.
- Unidentified or mixed debris: retain samples and escalate the analysis when the equipment has a safety, hygiene, electrical, sealing, or contamination-control function that makes the material source consequential.
Use the broader industrial hinge failure guide if the inspection also finds cracks, permanent deformation, door sag, retention failure, or structural damage. This page identifies the debris source; it does not replace the complete failure decision.
Build a Clean Baseline After the Repair
After the source has been documented and the approved correction is complete, remove the remaining external deposit so new material cannot be confused with the old event. Photograph the cleaned seams, pin ends, thrust faces, bushing lips, leaf edges, and mounting joints.
- Restore the final fastener condition, door load, hinge orientation, retainers, seals, latches, stops, and adjacent hardware.
- Operate the door through its permitted travel in both directions while observing the original emission boundary.
- Repeat the operating condition linked to the complaint, such as vibration, temperature, washdown recovery, or normal production exposure, within the equipment service procedure.
- Compare the same source, transport, and collection locations at defined maintenance checkpoints rather than judging only the visible panel below the hinge.
- Record whether new debris appears, whether its location matches the original path, and whether play, resistance, temperature, or door position has changed.
No universal number of door cycles or acceptable dust quantity applies to every hinge. The appropriate observation interval and acceptance boundary depend on the hinge design, equipment function, service environment, maintenance plan, and the released requirements for the assembly.
Share the Debris Map, Not Just the Dust Color
For a hinge-focused review, provide one photo of the complete door and hinge set, close-ups before cleaning, the installed orientation, the first sharp deposit boundary, any grease or bushing visible at the joint, the operating state when dust appears, and changes in play or motion.
HTAN can compare the visible interface and mounting information with available industrial hinge configurations. Material identification, equipment safety, structural approval, and contamination-control decisions remain with the responsible equipment and materials specialists.
Black Dust Around Industrial Hinges FAQ
Does black dust mean an industrial hinge is failing?
Not by itself. The deposit may contain wear debris, oxide, bushing or coating particles, lubricant residue, or external contamination. Active recurrence from one contact point, together with increasing play, binding, heat, pin movement, or material transfer, is more significant than color alone.
Is black hinge dust always metal?
No. Dark deposits can include metallic and oxide wear debris, polymer bushing particles, surface-finish flakes, aged lubricant, soot, fibers, or process dust. Particle shape, the first emission boundary, adjacent wear marks, and material analysis are more reliable than color.
Should I lubricate a hinge as soon as black dust appears?
Document the as-found pattern first. Lubricant can move particles, darken the residue, and temporarily reduce friction while misalignment, bore wear, thrust contact, or mounting slip continues. Apply only the lubricant and service method specified for that hinge and equipment environment.
How can I separate hinge pin wear from mounting-face fretting?
Pin or bushing wear is more likely to leave a fresh trace at a knuckle seam, often with a corresponding loaded track inside the joint. Mounting-face fretting begins at the leaf-to-panel or bracket contact and may break a witness line. Observe both locations before tightening or disassembly.
Why does only one hinge on the door produce black dust?
The hinges may not share load, alignment, and structural support equally. One joint can run against a loaded edge because of door deflection, axis mismatch, latch pull, bracket movement, or local reinforcement. Compare the contact direction at every hinge before replacing the dusty one.
Can equipment keep operating when black dust appears at a hinge?
Dust alone cannot determine continued use. Stop and follow the equipment service procedure if there is rapid recurrence, door drop, rising resistance, local heat, pin or retainer migration, cracking, loss of sealing, or a change affecting guarding or containment. The responsible equipment owner must define acceptance.