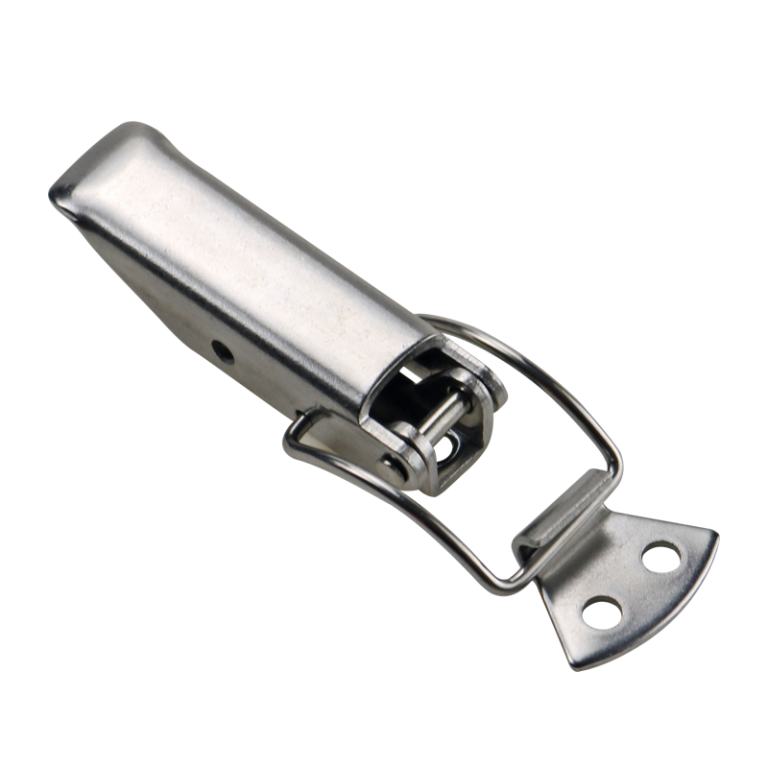
HTAN is one of the leading manufacturers of industrial hinges, handles and latches in China.


The handle still snaps shut, but the cover rattles. A witness mark on the keeper no longer aligns with its original position. Or an adjustable draw latch needs another turn every few months to feel tight. When draw latches lose clamping force, changing the draw length may restore handle effort for a while, but it can also erase the evidence that identifies the failed interface.
A draw latch does not create preload by itself. Its closed condition comes from the latch base, linkage, hook or drawbar, keeper, mounting panels, door position, and gasket stack acting together. A small permanent change at any one of those points changes the effective distance the mechanism must pull.
A latch that was once tight usually loses useful pull-down because the keeper moved, the linkage developed lost motion, the gasket reaction changed, or the supporting structure shifted. Preserve the original adjustment, find where useful travel disappeared, and correct that interface before resetting the latch.
Scope: This diagnosis starts with an assembly that once closed acceptably and later lost pull-down. If the latch never fit correctly, return to the stainless steel draw latch selection guide and review span, clamp travel, keeper geometry, and mounting datums before treating the condition as wear.
The three-state checks below apply primarily to lever-operated over-center draw latches with a separate keeper. Screwdown, rotary, and proprietary linkage designs require their own model-specific operating sequence.
When Draw Latches Lose Clamping Force
Handle position is not a clamp-force measurement. A lever can reach its stop after the keeper has moved, a pivot hole has elongated, or the gasket has become permanently thinner. The mechanism looks closed because the visible lever completed its travel. The closed assembly can still have less tension.
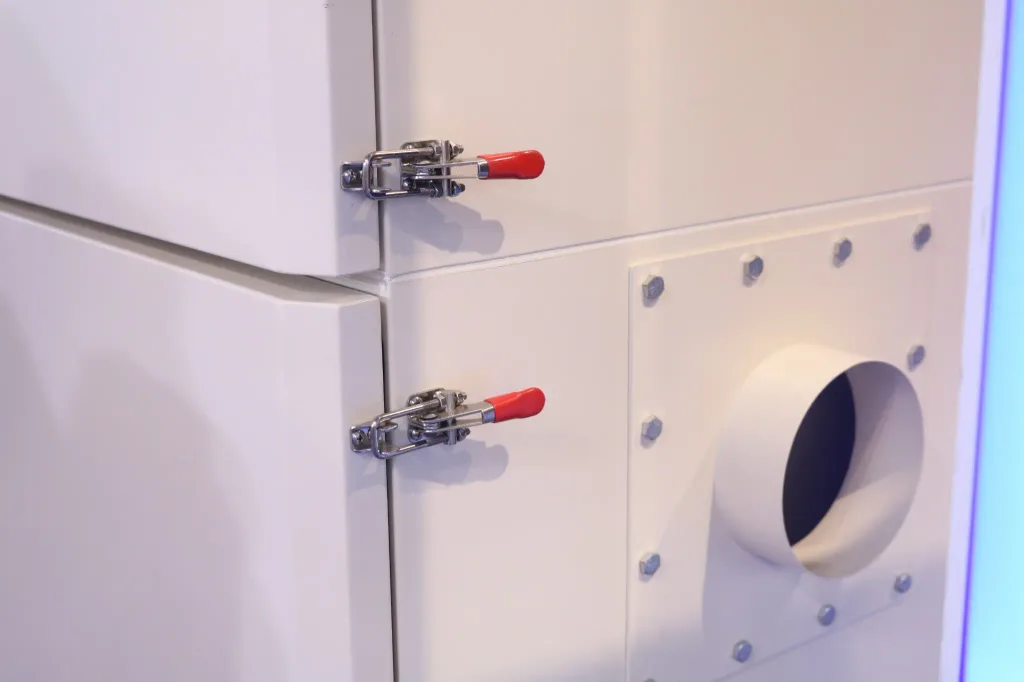
Three quantities are commonly mixed together:
- Operating effort is the force applied to the handle. Friction, lubrication, handle length, and the operator’s hand position affect it.
- Clamping force or pull-down is the installed tension drawing the two sides together. It depends on the mechanism and the compressed assembly stack.
- Holding capacity is a model-specific limit for resisting load in the closed condition without unacceptable deformation or release. It is not automatically the force being applied to the gasket.
A light handle can indicate reduced preload, but it can also indicate lower friction. A heavy handle can indicate high pull-down, or it may only be fighting side contact. Treat handle feel as a symptom, not a result.
Preserve the Evidence Before Adjustment
Do not start by changing the draw length. That changes the geometry you are trying to diagnose.
With the equipment isolated and the door or cover safely supported, photograph the latch from the front, side, and along the draw direction. Mark the current keeper outline, latch-base outline, adjustment position, and any locknut position with a removable witness mark. Record how much free movement occurs before the hook or drawbar begins to load.
Look before cleaning. Fresh polished metal, displaced paint, fretting residue, an elongated hole, a bent bracket, or a bright line on one edge of the keeper may be more useful than the final handle position. Lubrication can hide friction. Tightening can hide movement. Bending the keeper removes the original reference entirely.
- Record the handle angle when the hook first contacts the keeper.
- Record the final lever position and whether it reaches a positive stop.
- Measure the keeper and latch-base locations from stable enclosure datums, not from a flexible door edge.
- Note the exposed thread or other adjustment reference defined by the product drawing.
- Compare paired latches without changing either one.
Where Does Resistance Disappear?
The fastest useful test is to separate three states. Keep hands out of the pinch line and do not unlatch a pressurized, loaded, or unsupported cover.
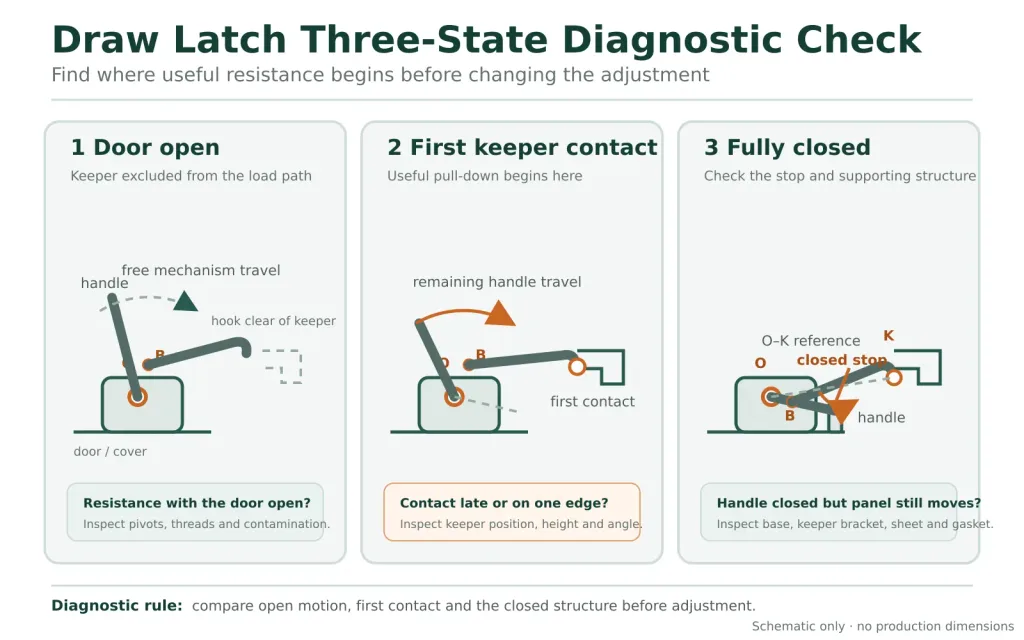
1. Door Open
Cycle the latch without engaging the keeper. The lever and linkage should move through their intended path without a hard spot, scraping, or a sudden jump. Roughness at the same handle position points toward contamination, a bent member, pivot damage, or internal wear. Free motion does not prove the latch is healthy, but it removes the door, gasket, and keeper from the immediate load path.
2. First Keeper Contact
Close the door slowly and watch where the hook meets the keeper. Contact should occur on the intended surface and with enough remaining lever travel to pull the assembly into its closed condition. Edge contact, lateral scraping, or contact only after the handle is nearly flat indicates a position problem. This is where a shifted keeper and a shortened effective draw length begin to look different.
3. Fully Closed
Observe the latch base, keeper bracket, nearby sheet metal, and door edge while the lever completes its stroke. One part should not move merely because the handle force rose. Push and pull the closed panel near the latch using a controlled, safe check. Movement with a fully closed handle shows that lever position and retained preload have separated.
Five Interfaces in the Clamp Path
The latch only reacts to the final distance between its mounting point and the keeper. It cannot tell whether that distance changed because of metal movement, joint clearance, or gasket thickness. The following evidence map keeps each entity and attribute separate.
| Entity | Attribute to compare | Useful evidence | Effect on the clamp path |
|---|---|---|---|
| Latch base and panel | Position, flatness, attachment stability | Paint fracture, fretting, rocking foot, dished sheet, loose or displaced fastener | Moves the mechanism away from or toward the keeper |
| Linkage and pivots | Pin fit, hole shape, stop position, over-center travel | Rattle before hook movement, elongated holes, asymmetric wear, changed stop contact | Converts handle travel into lost motion instead of draw |
| Hook, bail, or drawbar | Effective length, straightness, thread condition | Bend, thread movement, damaged lock feature, wear at the contact radius | Changes engagement and the pull distance |
| Keeper and bracket | Longitudinal position, height, angle, bracket stiffness | Shifted outline, edge witness mark, elongated holes, local bend | Changes first contact and remaining pull-up travel |
| Gasket, door, and frame | Closed stack, rebound, local gap, coplanarity | Permanent groove, uneven compressed thickness, door twist, different rebound around the perimeter | Changes the distance and reaction the latch closes against |
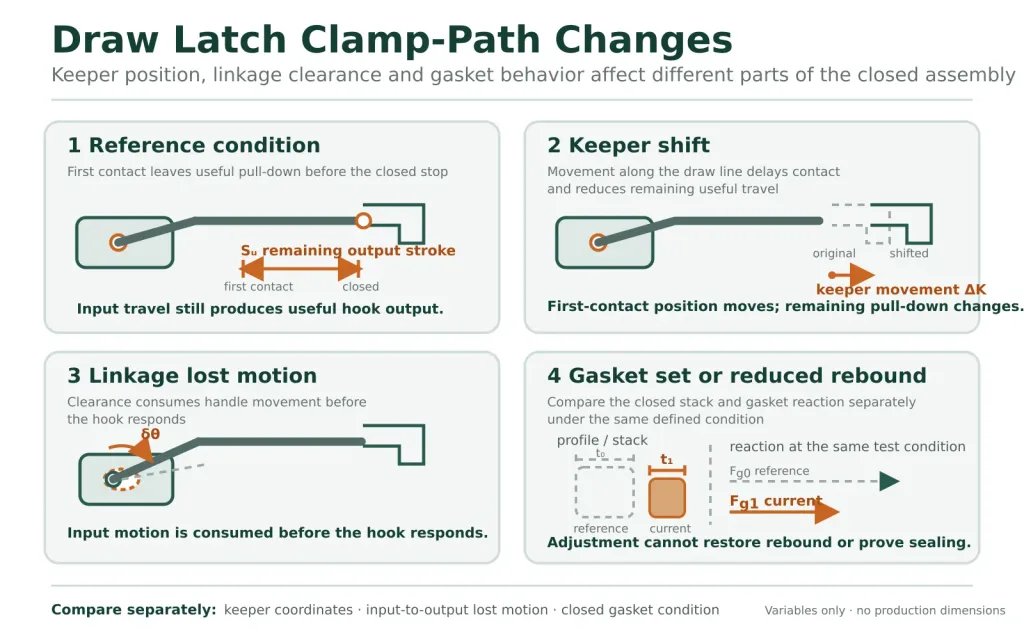
Keeper Shift Changes Effective Draw Length
A keeper does not have to become visibly loose to alter the closure. A slotted bracket can creep. A thin mounting flange can bend. Fastener holes can enlarge. A welded bracket can remain attached while the surrounding sheet changes angle. Even coating settlement under a small foot can change the final position.
Direction matters. Movement along the draw direction changes the distance the latch must pull. Movement across that line causes side loading and can make the handle heavy without producing useful compression. Keeper rotation can do both: the hook first contacts one edge, then slides as the lever closes.
Inspect the keeper against an enclosure datum and against its original outline. Check both the loaded and unloaded position. A bracket that returns after release can still be too flexible in service. Fastener torque alone does not prove that the contact plane stayed where the drawing placed it.
Position can still measure correctly while the contact geometry has changed. Inspect the keeper edge, hook radius, bail contact surface, and any replaceable strike insert for grooving, flattening, or localized material loss. Wear at the contact pair changes effective engagement even when the mounting holes have not moved.
The adjustment worked, then the looseness returned. Consider two draw latches on a wide access cover. The upper latch becomes light, so its adjustment is changed to increase pull-down until the handle feels like the lower latch. After further operation, it becomes light again. Witness marks show that the upper keeper bracket has moved each time the latch was tightened. More adjustment increased the load on the same flexible bracket; it did not stabilize the datum. The corrective direction is to restore and support the keeper position, then reset the latch. This is an illustrative engineering scenario, not a customer project record or product test claim.
Wear Becomes Lost Motion
A new linkage converts most of the lever movement into motion at the hook or drawbar. As pivot clearance grows, the handle first takes up that clearance. The lever can travel farther before the hook moves, leaving less useful stroke after keeper contact.
Pivot Pins and Holes
Look for oval holes, stepped wear on a pin, dark fretting residue, and a joint that shifts laterally before it rotates. Compare the input handle movement with the output movement at the hook. A small clearance at several joints can accumulate into visible lost motion at the keeper.
Threads, Clevises, and Locking Features
An adjustable drawbar can change length because a locknut moved, a thread is damaged, or a retaining feature no longer holds its setting. Mark the relationship between parts before cycling. Do not judge thread condition only by the exposed length; usable engagement and the approved adjustment window must come from the exact product drawing.
Wear Is Not Friction
Lubricant may reduce friction in a serviceable joint when the manufacturer permits it. It cannot put material back into an elongated hole, restore a worn stop, straighten a bent link, or recover over-center travel. A smoother worn latch is still worn.
Over-center behavior also deserves a direct look. For an over-center draw latch, positive locking depends on the installed pivot relationship reaching the intended position beyond center and against the designed stop. A flat handle does not prove that the internal pivot relationship is unchanged. Use the model drawing or supplier service limit; do not invent a universal over-center angle.
Gasket Set Changes the Closed Stack
A gasket that loses rebound or remains permanently thinner changes the door-to-frame stack. The keeper and latch may not have moved at all. The latch may reach its stop before developing the previous reaction force, or the door may sit farther into the opening with less gasket resistance.
Compression set, stress relaxation, creep, permanent groove formation, adhesive movement, and local damage are related but not interchangeable observations. The installed gasket may retain its shape yet produce less reaction force, or it may show permanent thickness loss while the door geometry remains stable. Use the gasket supplier’s profile, compound, force-deflection data, compression limits, and replacement criteria.
ASTM D395 provides methods for evaluating the ability of rubber to retain elastic properties after prolonged compressive stress. It does not define the correct installed compression for this enclosure, the clamp force a particular draw latch must produce, or the point at which a field gasket must be replaced. Those acceptance limits remain product- and project-specific.
Measure the closed gasket condition at several perimeter locations using a method suitable for the gasket and enclosure. Compare like with like: the same profile, material, temperature condition, dwell history, and measurement method. A single uncompressed thickness reading at a cut end does not describe the reaction around a closed door.
Tightening an adjustable latch may remove free movement after gasket set. It does not restore lost rebound, repair a split corner, or prove sealing performance. If the actual symptom is water entry rather than mechanical looseness, use the separate loose latch versus worn gasket diagnosis to trace the leak before ordering parts.
Panel Movement Can Imitate a Latch Fault
The latch base and keeper are only as stable as the structures carrying them. Thin sheet can dish around fasteners. A door can sag at the hinge line. A frame can rack during installation. Two latches can pull different portions of a flexible cover into different planes.
This produces a useful contradiction: the latch may pass an open-door mechanism check and the gasket may still rebound, yet the closed handle is light at one corner. Observe door position before the hook contacts, at first contact, and at full closure. If the door edge changes position before useful gasket compression begins, the structure has entered the diagnosis.
Do not force the rigid latch to become an alignment tool for an unresolved door. Increasing pull-down can temporarily draw a twisted panel into place while raising load on the keeper, latch base, hinge, and local sheet. Repair the datum or stiffness problem first.
Read the Pattern, Not One Symptom
No single symptom proves the cause. Use the state of the door, the location of lost motion, and physical evidence together before changing the adjustment.
| Observed pattern | Most likely path | Test before adjustment | Corrective direction |
|---|---|---|---|
| Hard spot remains with the door open | Linkage contamination, bend, pivot damage, or internal wear | Cycle the isolated mechanism and locate the same resistance point | Clean or service only as permitted; repair or replace damaged parts |
| Open motion is free; keeper contact has moved along the draw line | Keeper or latch-base shift | Compare both parts with stable datums and witness outlines | Restore the mounting position and supporting structure |
| Handle moves before the hook begins to move | Accumulated pivot, clevis, or thread clearance | Compare input movement with output movement at each joint | Replace parts outside the model’s service limit |
| Handle is heavy but useful pull-down is low | Lateral keeper contact or bent linkage | Look for one-sided witness marks and side movement | Correct alignment; do not use lubrication as a geometry fix |
| All latches gradually become lighter and the gasket remains thinner | Gasket set or reduced gasket reaction | Inspect the complete perimeter using the gasket supplier’s criteria | Address gasket condition, then reset closure geometry |
| One latch is tight while another is light | Door twist, uneven gasket stack, or unequal keeper position | Record door gaps and first-contact sequence at every latch | Correct the assembly plane before equalizing adjustment |
| Adjustment mark moves after operation | Thread, locknut, or retention failure | Witness-mark the adjustment and cycle without changing it | Restore the specified retention method or replace worn parts |
| A new gasket makes the handle suddenly heavy | Changed closed stack, not necessarily latch damage | Compare profile and target compression with the approved seal data | Reset only within the latch’s permitted adjustment range |
Repair the Interface That Changed
The correction should remove the cause of lost travel, not merely increase handle effort.
Moved Keeper or Latch Base
Restore the specified position from controlled datums. Repair enlarged holes, damaged fastener seats, cracked welds, or flexible brackets using an approved structural detail. Recheck the keeper contact face and hook overlap after the support is stable. Simply tightening the same moving joint may repeat the failure.
Worn Linkage or Adjustment Hardware
Replace components only when the manufacturer supports component-level service and supplies limits or parts. Peening a pivot, drilling an oversized hole, adding an unapproved pin, or welding a worn joint can change strength and motion without restoring the intended mechanism. When the exact latch cannot be restored, compare the draw latch product range using the original closed-assembly geometry, not the old product photo.
Gasket Set
Replace or redesign the gasket according to its sealing specification when it no longer provides the required installed response. A new gasket changes the stack, so the latch must be reset and checked again. Copying the worn-gasket adjustment onto the new seal can over-compress it or overload the closure.
Door or Frame Movement
Correct hinge condition, panel support, frame position, or local reinforcement before using the latch to pull the structure into place. On a multi-latch cover, establish the door plane and contact sequence before balancing individual adjustments.
Adjustment is the last step, not the first. Use it only after the changing interface is stable and only within the selected model’s permitted grip, thread engagement, keeper overlap, and over-center geometry.
Rebuild a Measurable Closed Condition
When draw latches lose clamping force, the repaired condition has to be defined by more than renewed handle effort. There is no universal draw-latch clamp-force value that can be assigned from latch size alone. The required condition depends on the model, the closed stack, the gasket force-deflection behavior, the number and location of latches, the panel stiffness, and the service loads.
After the root cause is corrected, record a repeatable closure signature:
- latch-base and keeper coordinates from defined datums;
- hook contact location and keeper overlap;
- handle position at first contact and at the closed stop;
- approved adjustment reference and locking method;
- compressed gasket condition at defined perimeter checkpoints;
- door gap or panel position at every latch point; and
- any model-specific closing-effort, draw-load, or inspection requirement.
For a repeatable field comparison, apply a hand force gauge at a marked distance from the handle pivot and record force against handle angle. Use the same pull direction, radius, operating speed, and temperature for the baseline and follow-up check. The result tracks operating effort; it is not a direct measurement of gasket clamp force.
Lost motion can be measured separately. Place a dial indicator against the hook or drawbar output, move the handle through its free travel before keeper contact, and record the input angle and output displacement. This shows whether handle motion is being consumed by pivot, clevis, or thread clearance. Keep the test load low enough that the fixture is not bending the mechanism.
When true latch output is required, use a load cell in a controlled keeper fixture that reproduces the selected model’s draw direction, mounting stiffness, contact geometry, and adjustment. Evaluate the gasket path separately by recording the door-to-frame gap or compressed thickness at fixed locations and relating those measurements to the gasket supplier’s force-deflection data.
If actual clamp force is an acceptance requirement, use a supplier-supported value or a project measurement method with a defined fixture, load direction, latch adjustment, gasket condition, and acceptance criterion. Do not substitute a holding-capacity rating or a handheld impression of lever effort.
Acceptance After Repeated Closure
A repair that passes one closure has only shown that the parts can occupy one position. Repeat the opening and closing sequence under a controlled setup and inspect whether the reference marks, contact point, adjustment, and door position remain stable. The cycle count, dwell, temperature, and applied load must match the project; they cannot be inferred from a generic article.
- No new movement at the latch base, keeper, adjustment, or fasteners.
- No one-sided scraping, hook walk, or unexpected stop contact.
- Stable first-contact and final handle positions.
- Stable gasket condition at the defined checkpoints.
- No free panel movement that the closed latch is expected to restrain.
- On multiple latches, a repeatable contact and closing sequence across all points.
A static closure check does not establish vibration retention. If the application includes repeated machine or vehicle vibration, use the separate guide to draw latches for vibration equipment and define a representative installed-assembly test. Do not claim vibration resistance from over-center appearance alone.
Share the Failure Evidence
A useful failure review needs the exact latch model or drawing, photographs before adjustment, keeper and latch-base datum measurements, adjustment marks, the door-open and door-closed symptoms, gasket information, and the service condition in which the change appeared. For paired or multi-latch covers, include every latch point rather than only the loosest one.
Send the Unadjusted Condition First
Share the model, closed-assembly view, keeper contact marks, mounting details, gasket profile, and the point where resistance changed. These inputs let the changed interface be reviewed before a replacement or new adjustment is proposed.
FAQ About Draw Latch Clamping Force Loss
Why does a draw latch close but not pull the door tight?
The handle can reach its closed position after the keeper has shifted, linkage clearance has increased, the latch base has moved, or the gasket stack has become thinner. Inspect first-contact position, useful travel after contact, mounting movement, linkage play, and gasket condition before changing the draw length.
Should I tighten an adjustable draw latch when it feels loose?
Not until the cause is known. Tightening may compensate for a stable tolerance change, but it can also hide a moving keeper, worn pivot, weak panel, or dead gasket. Preserve the adjustment and witness marks, identify the changed interface, repair it, and then reset the latch within the model-specific adjustment limits.
How can I tell keeper shift from draw-latch linkage wear?
A shifted keeper changes the contact location or measured position relative to the enclosure datum. Linkage wear creates input movement before output movement at the hook and may show elongated pivot holes, worn pins, or changed stop contact. Compare the open mechanism, first keeper contact, and fully closed condition without adjusting either part.
Can gasket compression set make a draw latch feel loose?
Yes. Permanent thickness loss or reduced gasket reaction changes the door-to-frame stack, so the latch may reach its stop without developing the previous reaction force. Adjustment may remove free movement, but it does not restore gasket rebound or prove sealing. Evaluate the gasket with its supplier data and reset the closure after any replacement.
Will lubrication restore lost draw-latch clamping force?
Lubrication can reduce permitted joint friction, but it cannot restore worn material, straighten a bent link, recover a shifted keeper, or increase gasket rebound. It may make the handle feel easier while the lost-motion problem remains. Follow the exact model’s service instruction and diagnose geometry separately from friction.
Should I replace the draw latch or the gasket first?
Replace the part that failed its own inspection. Linkage lost motion, damaged threads, or an unstable latch base points toward latch or mounting repair. Permanent gasket damage or inadequate rebound points toward gasket work. A leak can also come from alignment or another enclosure interface, so do not order parts from handle feel alone.
How much clamping force should a draw latch have?
There is no universal value. The required force depends on the latch model, gasket force-deflection behavior, number and spacing of latches, panel stiffness, service loads, and acceptance method. Use model-specific supplier data or a project test with a defined fixture and load direction; do not substitute handle effort or holding capacity.