HTAN is one of the leading manufacturers of industrial hinges, handles and latches in China.


When an industrial cabinet door stops sealing properly, the visible symptom is almost always the same: water gets in, dust gets in, or the enclosure fails an IP test. But the cause behind that symptom can be any one of five different problems — and replacing the wrong part first is one of the most common and most expensive mistakes in enclosure maintenance.
This guide is a diagnostic map. It does not deep-dive into any single cause; instead, it helps you identify which part of the door system is most likely failing and then points you to the detailed guide for that specific problem. Think of it as triage: figure out where the failure starts, then follow the right path.
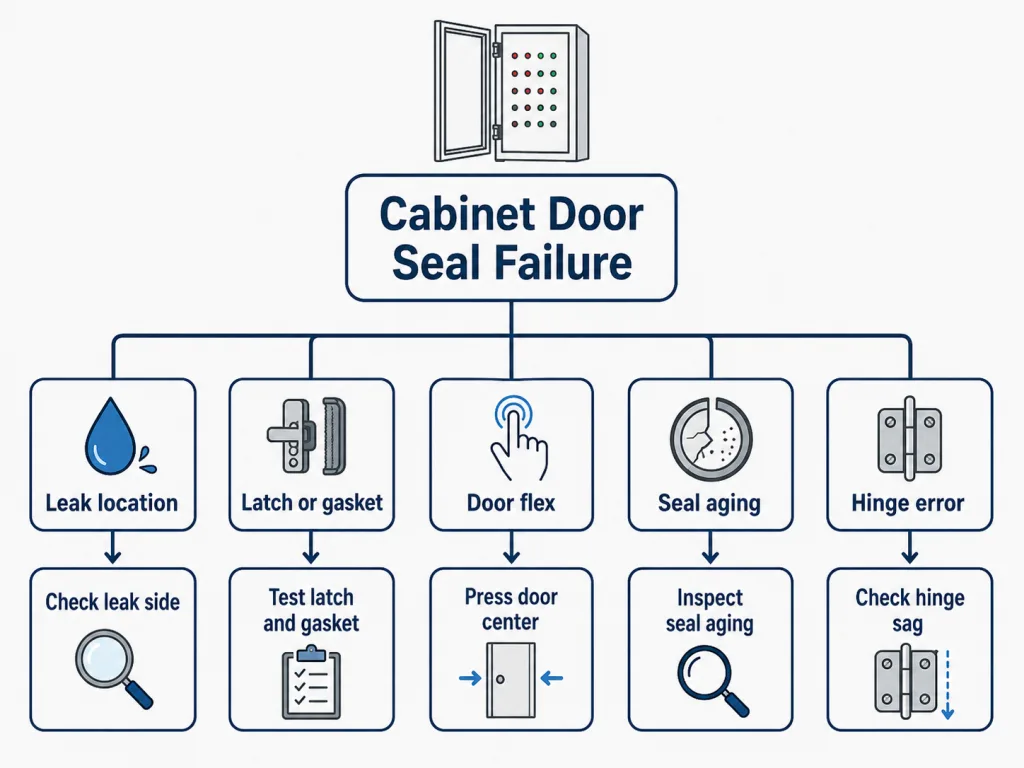
Quick Answer: The Five Causes of Cabinet Door Seal Failure
Cabinet door seal failure almost always traces to one of five root causes. Each one has a different first inspection step and a different fix:
| Root Cause | What Is Failing | First Clue | Detailed Guide |
|---|---|---|---|
| Leak location mismatch | Water appears on one side but entered elsewhere | Wet spot does not match the weakest seal point | Hinge-side vs latch-side leak diagnosis |
| Latch or gasket wear | Latch is loose, or gasket no longer rebounds | Door closes but does not pull tight; gasket feels flat | Loose latch vs worn gasket test |
| Door flex | Door panel bows; seal pressure is uneven across span | Center of door moves under hand pressure | Door flex vs latch failure |
| Seal degradation over time | Gasket aging, UV, compression set, preload loss | Seal was fine at install but worsened over months | Outdoor enclosure seal loss guide |
| Hinge selection error | Wrong hinge causes sag, twist, or gap | Door drops on the hinge side; diagonal gap appears | 3 hinge errors that cause seal failure |
Start with the clue you can see, then follow the matching path below.
Step 1 — Where Is the Leak or Seal Loss Visible?
The first thing most people notice is where the water, dust, or pressure loss shows up. But leak location is a starting clue, not final proof — water can travel along the gasket or frame before it becomes visible. A wet spot on the latch side does not always mean the latch failed; a wet spot on the hinge side does not always mean the hinge is bad.
Use the visible location to decide which side of the door to inspect first: latch-side leaks usually point to a compression problem; hinge-side leaks usually point to an alignment or geometry problem. The full location-based triage — including a diagnosis table for every common leak pattern — is in the hinge-side vs latch-side leak diagnosis guide.
Step 2 — Is the Latch Loose, or Is the Gasket Worn?
Once you know which side to focus on, the next question is whether the hardware or the seal material is the problem. A loose latch and a worn gasket can produce identical symptoms — the door closes but does not compress the seal enough. The difference matters because the fix is completely different: one needs a latch adjustment, the other needs a gasket replacement.
A simple hands-on test can separate the two without replacing any parts first. That test procedure — including how to read gasket rebound and latch engagement — is in the loose latch vs worn gasket leak test.
Step 3 — Is the Door Panel Itself Flexing?
Large cabinet doors can pass the latch test and still lose seal pressure — because the door panel itself is bowing. When the panel flexes, the gasket may compress at the edges but gap in the middle, and no amount of latch tightening will fix a structural problem. This is especially common on wide doors with thin skins or insufficient internal reinforcement.
If the door moves when you press on the center of the closed panel, or if the gasket compression pattern is uneven across the span, the problem may be structural rather than mechanical. The guide to door flex vs latch failure covers how to confirm flex, what causes it, and when to repair versus redesign.
Step 4 — Did the Seal Degrade Over Time?
Some seal failures are not sudden — the door sealed fine at installation but performance dropped gradually over months or years of outdoor service. That pattern usually points to gasket aging: UV exposure, heat cycling, compression set, chemical contact, or simple wear from repeated opening. The hardware may still be correct, but the seal material has slowly lost its ability to rebound.
If the enclosure is outdoors and the seal loss was gradual rather than sudden, the time-based degradation mechanism and maintenance approach are covered in the outdoor enclosure seal loss maintenance guide.
Step 5 — Was the Hinge Selection Wrong from the Start?
Sometimes the seal failure is not wear or damage — it was designed in. Choosing a hinge that is undersized, poorly spaced, or made from the wrong material for the door weight and environment can cause sag, twist, or frame pull that makes even a new gasket fail. Three specific hinge selection errors account for the majority of these cases.
If the door has sagged since installation, or if the hinge side shows a diagonal gap that was not there originally, check the hinge selection against the guide to 3 hinge selection errors that cause seal failure before replacing the gasket or latch.
Diagnostic Sequence: Where to Start
Use this sequence to avoid replacing the wrong part:
- Note the leak location — which side of the door shows water, dust, or pressure loss? Use the location to decide whether to start with latch compression or hinge alignment.
- Test the latch and gasket — before replacing either one, run the hands-on test to separate a loose latch from a worn gasket.
- Check for door flex — press the center of the closed panel. If the door moves, the structure may be the root cause regardless of latch or gasket condition.
- Consider time-based degradation — if the enclosure is outdoors and the failure was gradual, gasket aging or preload loss may be driving it.
- Review hinge selection — if the door has sagged or twisted since installation, the hinge may have been wrong from the start.
Most seal failures involve more than one factor. A door may flex slightly while the gasket is also aging, or a loose latch may mask a hinge that is slowly sagging. The sequence above helps you find the primary driver first, then check for secondary causes.
When to Involve a Supplier
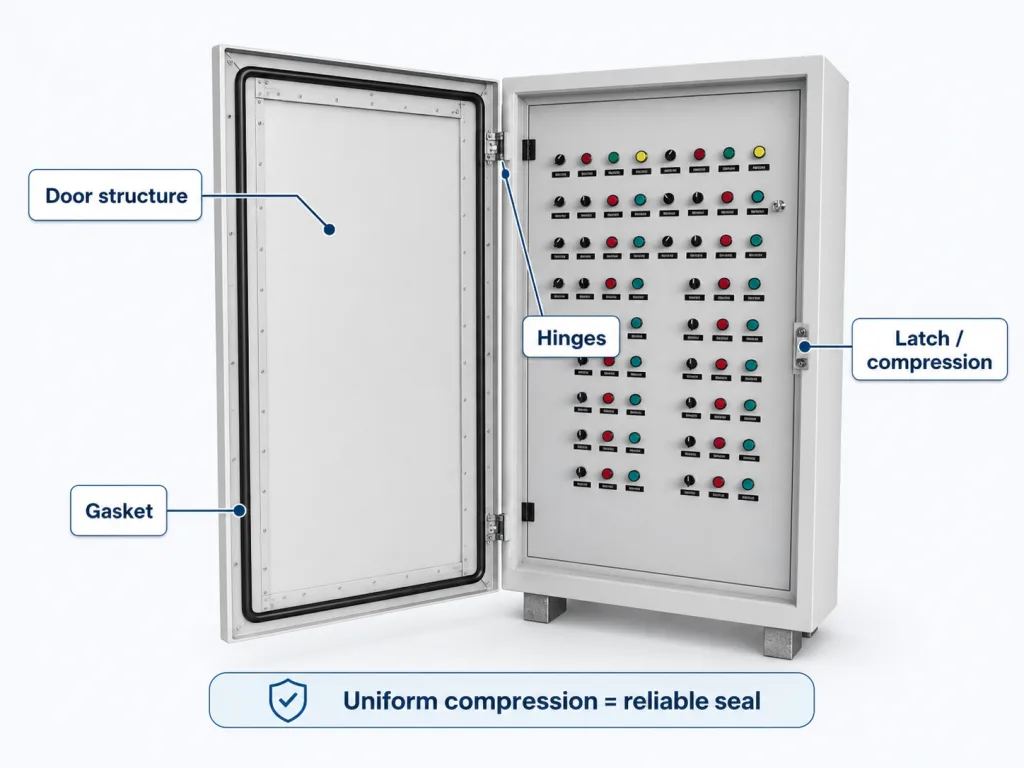
If you have worked through the steps above and the root cause is clear, the fix may be straightforward — tighten or replace the latch, swap the gasket, or correct a hinge. But if multiple factors overlap, or if the same failure keeps returning after repair, the door system may need to be evaluated as a whole: structure, hinges, compression latches, and gasket together.
When contacting a supplier, send the door size and weight, hinge type and spacing, latch type and location, gasket profile, the visible failure pattern, photos of the gasket compression mark on each side, and the enclosure’s required IEC 60529 IP rating. That context lets the supplier diagnose whether the issue is one component or a system-level mismatch.
FAQ
What is the most common cause of cabinet door seal failure?
There is no single most common cause — it depends on the cabinet. Outdoor enclosures most often fail from gasket aging or hinge sag. Indoor enclosures more often fail from latch wear or misalignment. The diagnostic sequence above helps you find the actual cause rather than guessing.
Should I replace the gasket first?
Not before checking door alignment. If the door is sagging, flexing, or out of plane, a new gasket will not seal evenly and the problem returns. Check hinge geometry, latch compression, and door flatness before replacing the seal.
Can a stronger latch fix a seal that keeps failing?
Only if the real problem is latch draw force. If the door is flexing, the hinge is sagging, or the gasket is worn, a stronger latch masks the symptom without fixing the cause. Diagnose first, then decide whether the latch is the right fix.
How do I know if the door is flexing or if the latch is failing?
Press on the center of the closed, latched door. If the panel moves enough to change the gap or seal line, the door is flexing. If the panel stays flat but the closing point is loose or shallow, the latch is the more likely cause.
Why does the leak appear on a different side from the actual failure?
Water can travel along the gasket line, frame edge, or internal surfaces before becoming visible. Wind-driven rain can push water sideways. That is why leak location is a starting clue for diagnosis, not proof of which component failed.
When should I consider redesigning the door instead of repairing it?
Redesign is usually needed when the door panel visibly flexes, the gasket compression is inconsistent across the span, the latch is already at the limit of its adjustment, or the same repair keeps failing. Those are structural signals that component swaps alone cannot solve.
Bottom Line
Cabinet door seal failure is rarely one broken part — it is usually one primary cause plus one or two contributing factors. The fastest path to a lasting fix is to diagnose the primary driver first: check the leak location, test the latch and gasket, check for door flex, consider time-based degradation, and review the hinge selection. Fix the structure before the hardware, and fix the hardware before the seal.
If the same seal failure keeps returning after repair, the problem is probably systemic rather than component-level. Send the door size, hinge layout, latch type, gasket profile, IP requirement, and failure photos, and HTAN can help evaluate whether the issue is one part or a full door-system mismatch.